Let’s talk about something super important in our world as freelancers: getting paid.
Because, let’s face it – we all love doing what we do, but we’ve got bills to pay and maybe a little fun to fund, right?

So, whether you’re juggling a bunch of freelance gigs each month or running a full-time writing hustle, one thing’s for sure: you need to get paid.
And guess what?
Many companies won’t even think about sending that cash your way until they’ve got an invoice in their hands.
That’s right, it’s all about the freelance invoice.
But, hold up!
What if you’re not exactly sure how to whip up an invoice that screams “professional”?
No worries! I’ve got your back.
In this post, we’re diving into the nitty-gritty of creating a freelance invoice template.
We’ll start with a visual example to get the gears turning, then break down all the essential elements you need to include.
And, because I’m all about making life easier, we’ll chat about some handy tools to streamline the process.
Let’s make sure you’re on the fast track to getting paid without a hitch.
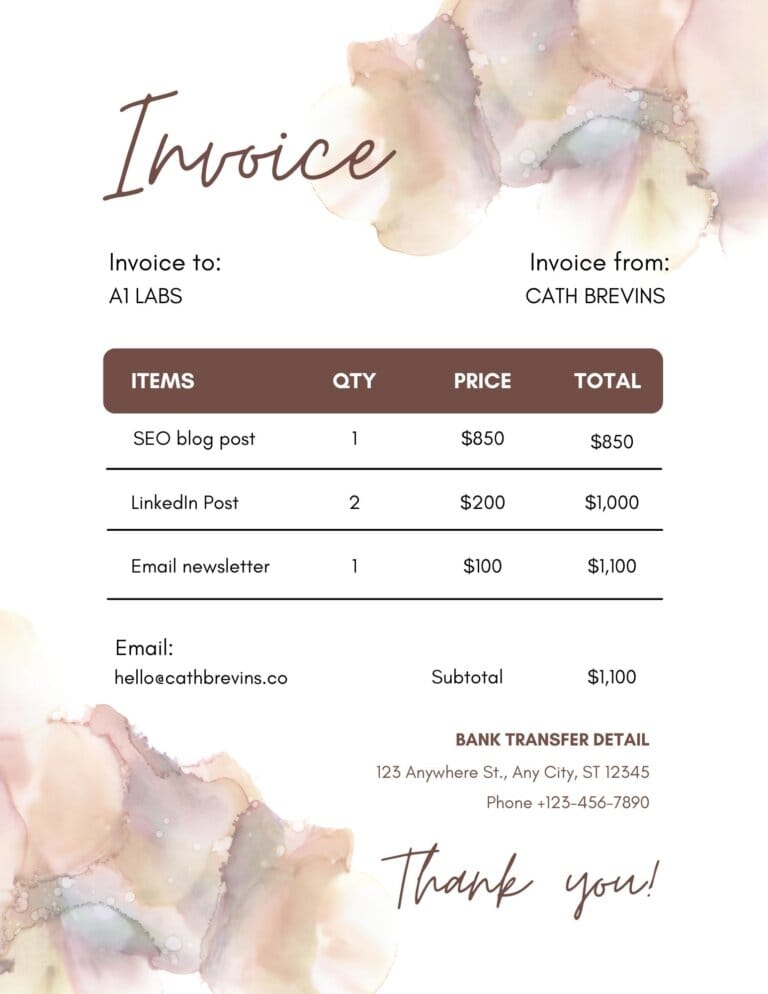
First! Here’s an example of a freelance invoice template you can use:
Why Use Professional Freelance Invoices?
Have you ever used a freelance invoice template before?
Don’t worry! When I was new, I didn’t even know that I need to have one.
So, let’s check out why freelance invoice templates should be part of your freelance business.
1. Makes You Look Like a Pro
First off, sending out a proper invoice isn’t just about asking for money—it’s about showing your clients that you mean business.
A well-crafted invoice tells your clients, “Hey, I’m a pro, and I’ve got everything under control.”
It’s like putting on your best outfit for a meeting; it sets the tone and shows you’re serious about your work.
2. There’s No Guessing Game
Now, let’s talk about keeping things clear and avoiding those awkward “Um, what’s this charge for?” conversations.
Freelance nvoices work like a charm for this.
They lay out everything in black and white: what services you provided, how much you’re charging, and when the payment is due.
It’s all about transparency, and that’s key to building trust with your clients.
3. Helps You Keep Organized
Freelance invoices are great for keeping your records tidy.
Imagine trying to track your earnings with a bunch of random notes and emails scattered everywhere.
Yikes, right?
Invoices for freelancers help you keep everything organized, making it a breeze to see what’s coming in, what’s going out, and where you stand financially.
Plus, when tax season rolls around, you’ll be thanking your lucky stars for those neat records.
Components of a Freelance Invoice

Alright, let’s get into the meat and potatoes of your invoice—the essential components that make it tick.
This is where you’ll show off your attention to detail and keep everything crystal clear for your client.
- Header: Start with a bang! Put your business name or your own name right at the top, in a font that means business. Got a logo? Pop it in there to add a touch of professionalism and make your brand memorable.
- Contact Information: This is like your business card. Include your email, phone number, and address so your client knows how to reach you. It’s all about making communication as easy as pie.
- Client’s Information: Don’t forget about your client! Add their name and contact details too. This ensures the invoice gets to the right person and helps avoid any “Who’s this from?” moments.
- Invoice Number: This is your invoice’s ID tag. It keeps things organized and helps you track payments. Start with a number like 1001 and keep it sequential for each new invoice. It’s like giving your invoices their own social security numbers!
- Dates: Mark the calendar! Include the date you’re sending the invoice (Invoice Date) and the date you expect to be paid by (Due Date). It sets clear expectations and helps keep everyone on schedule.
- Breakdown of Services: Here’s where you spell out what you did. List each service you provided, along with a brief description and the cost. It’s like the receipt you get at a restaurant, showing exactly what you’re paying for.
- Payment Options and Terms: Make it easy for your client to pay you. Mention whether you accept checks, PayPal, bank transfers, or other payment methods. And if you have specific payment terms or late fees, lay them out here. No surprises, just smooth sailing.
- Amount Due: The grand total! Add up all your services and boldly display what your client owes you. It’s the big number that everyone’s looking at, so make it stand out.
- Additional Notes: End on a high note with a friendly “Thank you” or a gentle reminder of any important details. It’s like the cherry on top that leaves a good impression.
Each of these components plays a crucial role in crafting an invoice that’s not just a bill, but a reflection of your professionalism and attention to detail.
Now, let’s move on to making that invoice look top-notch!
Creating a Freelance Invoice Template

Now it’s time to put everything together and create that freelance invoice template you can use for clients.
Creating a professional invoice is all about consistency and clarity.
Imagine you’re crafting a sleek business card – you’d want it to look sharp and convey all the necessary info, right?
That’s exactly what your invoice should do. Stick to a consistent format and font, like Proxima or Source Sans Pro, to give it that polished look.
It’s like wearing your best suit to a meeting; it shows you mean business.
Now, let’s talk templates.
Why start from scratch when there are tons of free invoice templates out there?
It’s like using a tried-and-tested recipe for your favorite dish.
Just grab a template from Canva that resonates with your style, and tweak it to include your details.
For example, if you’re a graphic designer, pick a template with a creative flair.
Add your logo, adjust the colors to match your brand, and voilà, you’ve got a custom invoice that’s both professional and personal.
Last but not least, double-check every detail.
Make sure your services, prices, and payment terms are as clear as day.
It’s like giving directions to a friend; you want to make sure they can reach their destination without any hiccups.
For instance, instead of just listing “consultation services,” break it down: “Consultation services – 2 hours @ $100/hr.”
This way, your client knows exactly what they’re paying for, and there’s no room for confusion.
By keeping these tips in mind, you’ll create invoices that not only look great but also make the payment process a breeze for your clients.
Sending and Managing Invoices

When it comes to sending and managing invoices, timing is everything.
For most freelancers, the best time to send an invoice is right after you’ve completed a project or at the end of each month for ongoing work.
It’s like serving dinner hot off the stove; everything’s fresh in your client’s mind, making it the perfect time to ask for payment.
Now, let’s talk tech.
Using an invoicing system just speeds up the whole process and makes your life a lot easier.
These systems let you create, send, and track invoices all in one place.
Plus, they often come with nifty features like payment integration, so your clients can pay you with just a click. It’s a win-win for everyone!
Before you hit that send button, take a moment to double-check your invoice.
It’s like proofreading an important email before sending it off; you want to make sure everything is spot-on.
Check for typos, confirm that the numbers add up, and ensure that all the details are correct.
A mistake-free invoice not only looks more professional but also prevents any delays in getting paid.
Lastly, consider setting up automated reminders for your clients.
It’s like having a friendly assistant who gently nudges your clients to pay on time.
These reminders can be a lifesaver, especially for those clients who might need a little extra nudge to clear their dues.
It’s all about making the payment process as smooth and hassle-free as possible.
Dealing with Late Payments

I hope you don’t have to deal with late payments but it’s par for the course for freelancers.
Dealing with late payments can feel like navigating a tricky dance floor, but with the right moves, you can gracefully guide your clients to settle their dues.
Here’s how to do it without stepping on any toes.
Asking for payment politely is key.
It’s like sending a friendly reminder text to a friend who borrowed your favorite book.
A simple, “Hey there! Just a gentle reminder that the invoice for our recent project is due. Let me know if you need any more details!” can work wonders.
It’s firm but friendly, showing that you’re on top of things without being pushy.
Next, let’s talk about late fees.
They’re like the polite but firm bouncer at the club, making sure everyone follows the rules.
Including a note about late fees in your initial invoice sets clear expectations.
For example, you might say, “Please note: A late fee of 2% will be applied to unpaid balances after 30 days.” It’s a gentle nudge to encourage timely payment and a fair warning that delays come with a cost.
Finally, follow-up communication is critical for those late payers.
Think of it as checking in on a friend who’s going through a tough time.
If a payment is late, reach out with a friendly email or call to remind them of the due date and inquire if there are any issues.
For example, “Hi there! I noticed that the payment for invoice #1234 is overdue. Is everything okay? Please let me know if there’s anything I can do to assist.”
It shows you’re understanding and willing to work with them, which can strengthen your client relationship and encourage prompt payment.
Types of Freelance Invoice Templates You Might Use

The type of freelance invoice you send can vary depending on the project or the client’s needs.
Here’s a rundown of some common types of freelance invoices
Pro Forma Invoice
A Pro Forma invoice is different from standard price quotations because they outline the terms of a transaction, but with a catch: these terms are subject to change.
Basically, a pro forma invoice is a preliminary estimate that helps prevent misunderstandings about costs by providing transparency to the buyer.
Businesses in various industries use pro forma invoices as part of their internal purchase approval process.
By defining all terms upfront, these invoices help limit additional discussions once a transaction has started, streamlining the sales process.
Pro forma invoices typically give the buyer a detailed sale price, including estimates for any commissions, taxes, or shipping costs.
They can be sent before shipping goods or along with the shipped items.
Although a pro forma invoice contains cost details associated with the sale, it’s not an official request for payment.
There’s no strict format for a pro forma invoice, so it can be tailored to fit the needs of the transaction.
Sales Invoice (Regular Invoice)
A sales invoice is a document issued by a seller to a buyer, detailing the products or services provided, the total cost, and payment instructions.
It forms a legally binding agreement, especially for significant transactions.
Sales invoices are typically generated at the sale’s conclusion and sent via email or invoicing software, which can keep both parties updated on any changes.
Key elements of a sales invoice include:
- Contact Information: Seller and buyer details, often accompanied by a company logo.
- Invoice Number and Date: A unique identifier and the issuance date for organization and reference.
- Description of Goods or Services: An itemized list of what was provided, with descriptions, prices, and quantities.
- Payment Terms: Instructions on how and when payment should be made, including accepted methods.
- Amount Due: The total cost, including itemized charges, taxes, and any discounts or prepayments.
Consolidated Invoice
Consolidated invoices simplify billing by combining multiple transactions into one invoice.
This method reduces the chances of missed or delayed payments and saves time for both your business and your customers. It also helps keep your finances organized and can be more cost-effective than issuing multiple invoices.
Best practices for consolidated invoicing include:
- Determine the Correct Billing Cycle: Set a clear billing cycle to inform customers when payments are due, such as weekly, monthly, or quarterly.
- Include All Required Payment Details: Ensure your invoice includes essential information like the invoice number, issue date, payment due date, total amount due, service or product details, subscription ID, billing interval dates, payment method options, and contact details for inquiries.
By following these practices, you can make your billing process more efficient and customer-friendly.
Retainer Invoice
Retainer invoices are best for securing ongoing services.
A retainer fee is an upfront payment to reserve a professional’s services, which doesn’t guarantee a specific outcome or represent the total project cost.
It’s treated as a liability until the service is delivered, at which point it becomes revenue.
A retainer invoice bills these fees and includes standard invoice details like company and client information, invoicing and due dates, and a breakdown of services and costs.
The key difference is that clients pay in advance.
Automating the invoicing process for regular retainer fees can save time and money.
For fixed retainers, regular invoicing is necessary, typically monthly, with adjustments made as project costs vary.
Let Invoicing Tools Help You Create a Freelance Invoice Template

Invoicing tools like FreshBooks, Invoice Ninja, and PayPal can be game-changers for creating and managing your invoices.
These platforms offer a range of features to streamline your billing process and keep your finances in order.
FreshBooks is known for its user-friendly interface and comprehensive features.
It’s not just about invoicing; you can also track your time, manage contracts, and store important files all in one place. It’s like having a personal assistant for your finances.
Invoice Ninja is another great tool, especially if you’re looking for a cost-effective solution.
It offers a free plan with essential invoicing features, and you can upgrade for more advanced options like time tracking and contract management.
PayPal is a familiar name, and it’s not just for sending and receiving payments.
You can use PayPal to create and send invoices directly to your clients. While it may not have as many features as FreshBooks or Invoice Ninja, it’s a reliable and straightforward option for managing invoices.
It’s Time to Create Your Invoice
There ya go!
I hope you found this article helpful in helping you create your own freelance invoice template or try an invoicing tool too!


Leave a Reply