When you start a freelance writing career, you begin by researching what you need to become successful. But as soon as you start your freelance journey, you realize you need a set of new skills.
Writing web content is one of the most important skills you need to learn from the beginning. This will help you start this amazing new career on the right foot.

Writing for the web is an important skill freelancers need in the beginning.
In this post, you will get 10+ tips to improve your web content writing. These tips are easy-to-follow and will give you a leg up when looking for new clients.
Clients will know that you’re a serious freelance writer with experience.
The order of these tips throughout this post is key; it’s the order I recommend you use to avoid roadblocks.
If you apply these simple tips right away, I’m sure you will see a huge improvement from the get go.
Know The Golden Rule
The number one thing you must know about writing for the web is that it’s different from any other kind of writing.
Writing essays, case studies, novels, poetry, etc. is not the same as web content writing, so stop thinking it’s the same as writing one of those.
When writing for an online audience, forget about how you learned to write in high school or college.
Web content writing has its own rules, even when it comes to where people consume it: online, with a computer or mobile device.
Takeaways:
- Never forget that online writing is different from what you’ve always known.
- It has its own rules.
Research Your Topic
Before you think about opening a word processor and starting to type, you need basic ideas that will help you make decisions. The goal is to create and organize your content from the start.
When you have your topic, the next step should be searching for keywords.
Keywords help you know if your topic is relevant and how many people have searched for it. They also have a main role when it comes to optimizing your content for SEO (Search Engine Optimization).
This just means that applying good SEO practices, like researching for the right keywords, adding good titles, and creating good URLs for your post, will improve the quality of your content in Google’s eyes.
Think of keywords as your basic dough for your SEO cake; if you don’t mix the right ingredients, it will never arise. They will also help you when it comes to creating your headline.
There are some great tools that make keyword research and start learning about SEO seamless:
- Google keyword planner: This tool is the most popular keyword research tool, and it’s free and easy to use. You can search for keywords and look for the results and related keywords.
- Keywordini: This is a free tool that also works great to find volume and related keywords.
- Buzzsumo: This one is a bit different. When you search a keyword in Buzzsumo, you get the best content on the web that has used those words. It’s free up to a limited amount of searches per day. It also has a paid version that gives you more in-depth info.
- Yoast SEO plugin for WordPress: This tool is free and works with WordPress websites. Just install it, and it will analyze and show you how your content is doing in terms of SEO. The Yoast SEO website has a lot of information on SEO, too.
- You can find reviews on many other top tools in this keyword research tool roundup over at Authority Hacker.
Finally, create a specific document to write down all the information you’ve gathered. This helps you organize your research, including:
- Main and related keywords.
- Links to content that used these keywords.
- Articles of interest.
- Tools that your readers can use.
Takeaways:
- Once you got your topic, your next move should always be to research.
- Keywords are essential when creating web content. They are your base.
- Write down what you’ve researched, and keep it handy. Return to this while you write your content.
- Start learning about SEO; it’s a must.
Craft Your Headline
Creating headlines is a craft but is one you can learn by following basic guidelines.
For me, there are 5 basic things to consider when creating one:
- Define what type of headline goes best with your content.
- Use great resources like this article that talks about what types of headlines you can use. Some of them include lists, how-to’s, and questions.
- Make it interesting; headlines are the things that grab your reader’s attention.
- Include at least one keyword.
- Use emotional superlatives: amazing, essential, ultimate, simple, etc.
- If possible, keep it short: 6 to 7-word headlines work better.
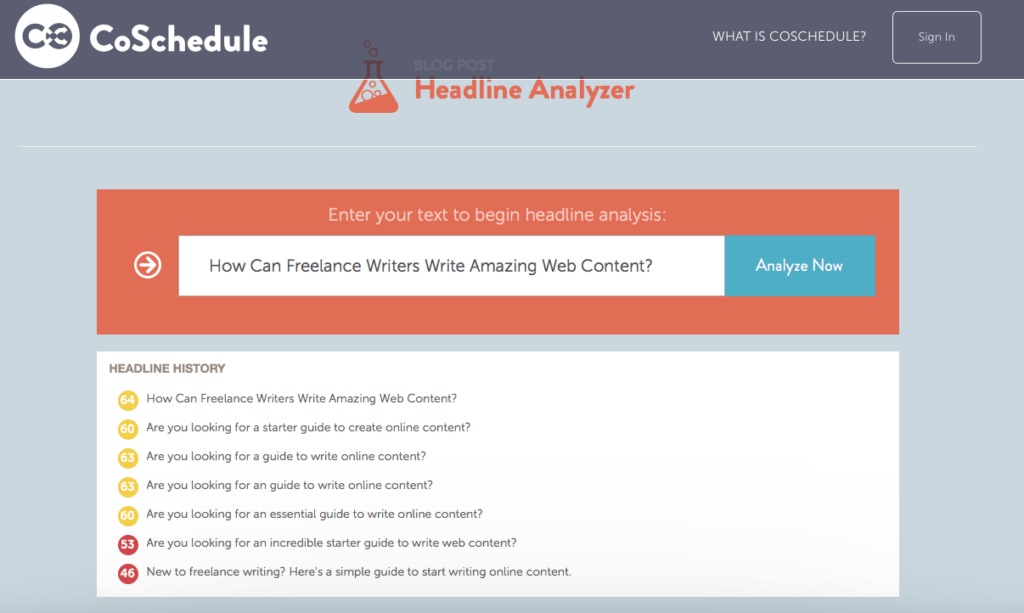
There is a great tool that is helpful: the Coschedule Headline Analyzer.
This tool analyzes your headline, grades it, and then explains the elements of your headline in easy-to-understand graphs.
For this post I used the tool, and as you can see in the screenshot below, I submitted different headlines that resulted in different grades. From this, I was able to make a decision about which one was the best suit for my post.
Takeaways:
- Don’t stress out about creating your headline.
- Follow these basic tips, and it will soon become a breeze to create headlines.
- Use Coschedule Headline Analyzer to improve your headline game and gain confidence.
Work On Your Hook
Otherwise known as the intro, your hook goes immediately after your headline.
This is your opportunity to tell your readers what they will get out of reading your post. It’s as simple as that.
Tell them what the value is that you are sharing with them and what you are offering to them.
To help you identify your hook, answer the following questions to yourself:
- What do you offer? (Your background, expertise, experience or an exclusive advice.)
- What will the readers get out of this blog post?
- How will you keep your promise?
Takeaways:
- Keep it simple.
- You can’t offer too many promises. One is more than enough.
- Always keep in mind your hook while writing your content.
Divide Your Content Into Digestible Pieces
When people read online content, they tend to skim it. That means that they make a quick swift of your content. This is why dividing your content into easy and digestible bits is essential.
The best way to do this is to create headings and subheadings. This allows the reader to identify what your content is about and what parts may be the most important for them.
Takeaways:
- Think of your content as a mini-book; books have chapters to make it easy to read them.
- Your headings and subheadings are your chapters.
- Make them relevant and eye-catching.
Use Formatting Essentials
There are 4 things to achieve great formatting when writing online content:
- Short words: Write in plain and conversational English. Avoid using long and complicated words.
- Short sentences: Cut unnecessary and redundant words. (See what I just did? I broke my own rule. I used two long and complicated words that have the same meaning.) A better way is: cut words you don’t need.
- Short paragraphs: Keep paragraphs between 3 or 4 sentences long.
- Use bullet lists: This helps you sort your content and break it down into even more pieces.
Takeaways:
- On the web, less is always more.
- Don’t write like you used to just to impress your teachers.
- Write like when you talk with easy-to-understand words. Plain English is your best friend.
An excellent tool that can teach you how to write this way is Hemingway App.
Make Your Content Visual
Adding visual media to your content can trigger your readers to share it. I believe it also works as another way to break up your content and to keep your readers interested.
There are several kinds of visual media you can use:
- Images: This includes the blog header image and images or screenshots that show what you are talking about. Readers like to see the images; they can relate to them and it increases the chances of them sharing.
- GIFs: Nowadays, GIFs are popular throughout social networks. Create your own GIFs and integrate them into your content.
- Infographics: Sum up the key parts of your content using infographics. It also gives your readers something to share with their followers.
- Relevant videos: If you find reliable videos that complement your content, embed them within your content.
Tools to add visual media:
- Canva: This is an easy-to-use, free tool to create and edit images for your content.
- Gifmaker.me: Make GIFs with different images.
- Infogr.am: This tool provides templates and is a great platform to create infographics.
- Youtube: Just copy and embed the video link to place it on your content.
Takeaways:
- Visual media adds value to your content.
- It increases the chances of sharing.
Write a Conclusion
Here is the part where you summarize what you explained in your post.
I recommend you mention your hook again and make it clear how your readers can keep implementing it.
This is your chance to wrap up your content in a nice and big bow.
Always Ask for Something
Adding a clear call to action (CTA’s) is essential for everything you create. Good CTA’s use active voice and verbs. Remember, you’re calling to ACTION!
If you want your readers to buy, download, subscribe, share, comment, or do anything, the only thing you have to do is ask them! Yep, it’s that simple.
You have to look at this as a trade. Provide valuable info, and ask kindly for an action; there is a high chance that they will actually do it.
Takeaways:
- Drop the shame, and ask your readers to do something.
- Remember: It’s a win-win situation.
- You create value for them, and they can help you by doing one simple thing.
Remember That Learning Never Ends
Creating web content is a skill that never stops evolving. There is always new advice, tools, and how-to’s. Keep up with the latest trends and tools people are using to write online content.
Make sure to identify blogs and influencers and follow them. Check their content and advice on a regular basis; make this a habit. You can also find communities and Facebook groups that are great hubs for when you need any help.
This habit could mean that you stay at the top of your game and that you keep improving. Start engaging with the industry leaders to create opportunities for your own career.
Don’t forget to try new tools that can help you improve your writing and content creation. A new tool could mean a huge step forward to your career and business.
Takeaways:
- Always stay up to date with the latest trends.
- Follow people and businesses that add value to your freelance career.
- Invest time in finding influencers and communities you can rely on.
- A new tool may have a positive impact on your career. The worst possible scenario is that you stop using them after a few tries.
Extra Tips and Tools
- Use Google Docs or Evernote to write your content. They are free and easy-to-use tools that have cloud-sync and make it simple to share content with your clients or teammates and keep your work organized.
- If your blog posts are 2,500-3000 words or more, put in a table of contents.
- Check your content with Copyscape. Almost all clients use it to make sure you are not plagiarizing.
- Create your own blog post template to always remember what you need to cover when writing a new post.
As we learned so far, creating web content is a completely new skill for the majority of us. But it is definitely a skill that is worth our time. It will increase opportunities as you start as a freelance writer.
When I was starting as a freelance writer, 7 out of the 10 articles I read about this same topic left me feeling like I needed to climb a mountain just to start creating.
I’m not saying the info wasn’t valuable, but I ended up thinking that I needed to do COMPLICATED things.
The truth is that you need to do a lot of things, but we don’t have to complicate anything. They are just small steps in a somewhat big staircase.
That’s why with these 10+ tips I shared with you today, you can start as soon as now.
It just takes one step at a time.
Which one of these tips did you find most useful? Let me know in the comments.


6 Comments