You did it! You conquered one of the greatest hurdles standing in the way of becoming a freelancer.
You created your professional writer website… all by yourself.

Creating your website is just the first step. Now you have to make sure nothing happens to it.
Well, either that or you paid someone to do it.
But either way, you got past that major hurdle.
Now, let’s talk about website maintenance.
Wait, what?
Yes, you have to learn how to maintain a website as a new freelancer. Creating your website is just the first step. Now you have to make sure nothing happens to it.
Maintaining a website is important. Remember, your website is the best way to help new clients to find you, show off your portfolio, and establish your authority as a freelancer.
A simple web maintenance routine can include the basics like updating themes, plugins, and WordPress core files.
More extensive website maintenance plans can also include testing pages speeds, restoring database backups, and reviewing analytics.
But hiring someone to maintain your website might not be in your budget, especially if you’re just starting out as a freelancer.
These plans to maintain your website can cost anywhere around $35 per month for a small website to thousands of dollars for larger websites.
The good news is that you can keep your website safe with a simple maintenance routine in as little as one hour per week. Don’t worry. You don’t need to be an expert.
I’ll show you how to maintain your website in 5 easy steps.
Ready? Let’s get started.
1. Perform Regular Backups
Depending on the package you purchased, your host might be performing regular daily or weekly backups.
But you shouldn’t rely completely on your host’s ability to assist you when you need them. If your website goes down, you don’t know how long it might take to reach their support team.
As a freelancer, the longer your website is down, the more revenue you could lose. It can’t hurt to have your own backups.
If you have a full backup of your website you can restore it at any host, if necessary. There are two important things to consider when creating your back up schedule:
1. How often should you back up your website?
After your website is complete, you’re not likely to be making major changes on a daily basis. A full weekly backup of your entire website (files and database) and daily database backups will do the trick.
2. Where do you store your Backups?
For increased security and safety, your backups should be stored in a cloud location like Google Drive or DropBox, and not in a location on your host’s server.
This ensures that you are still able to access your backup if your hosting provider is unavailable.
There are a few plugins that you can use to back up your website. I recommend using UpdraftPlus which is the most popular backup plugin in the WordPress repository. The free version offers more than enough features for the average user including:
- On-demand and scheduled backups
- The ability to back up to cloud storage including Dropbox and Google Drive
- An easy one-click option for restoring your database
- Email reports when a back up is created or when there is an issue
UpdraftPlus can be installed directly from your WordPress Dashboard, just search for it, install and activate it. Then set up your back-up schedule and remote storage location (here’s a step by step guide to show you how).
Before you start your website maintenance each week, confirm that your backups are being created and stored in your remote location as expected. If not, manually create a backup up before you make any changes.
2. Monitor Security on Your Website
More than one-third of the world’s websites are powered by WordPress.
This makes it a prime target for hackers. As part of your weekly tasks to maintain your website, you need to make sure that your website is secure.
Even though your hosting provider will have some security measures in place, the security of your website is mainly your responsibility. Don’t worry, you don’t need to know all the ins and outs of WordPress security.
A good security plugin will do.
The security plugin you choose should:
- Provide login security like two-factor authentication (2FA) and limit login attempts
- Implement a firewall to block malicious traffic
- Check WordPress core files, themes, and plugins for malware and other malicious code.
- Scan your site for known security vulnerabilities and alert you if an issue is found
The WordFence security plugin is the most downloaded security plugin for WordPress.
That’s because the free version comes with all the features mentioned above and more. And it’s easy to set up.
The default settings are enough for your needs but if you need a little help you can find it in this video tutorial.
During your weekly maintenance, review the notifications section of the WordFence Dashboard for any issues found in the most recent scan.
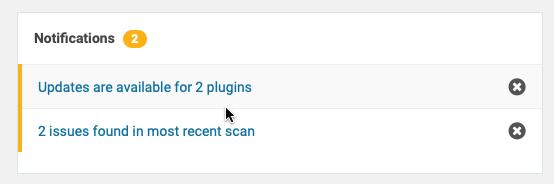
Most of the time, the issues reported will be plugin and theme update notifications which will go away after you run the updates (more on that below).
If malware is found, it will show up as a high (red) alert. Simply click on the alert for more information and delete it if necessary.
3. Update WordPress Core, Themes and Plugins
The third step in your weekly writer website maintenance is to update the WordPress core files, themes, and plugins.
Outdated plugins and themes are the main reason WordPress sites get hacked. Taking care of these updates weekly will ensure that your website is well protected from the latest security vulnerabilities.
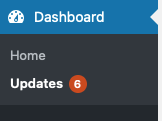
When there are new updates for WordPress core, themes, or plugins, you’ll see a notification in the toolbar at the top of your WordPress dashboard as well as in the dashboard menu on the left.
![]()
Clicking either of these options will take you to the WordPress Updates page which shows a list of updates to be installed.
When there is a WordPress Core update there will be a notification at the top of the updates page.

By default, WordPress is set to install minor core updates automatically, which is fine because these are usually security updates that need to be installed immediately. (Nb. Minor updates have three numbers e.g. 5.4.2, while major updates have two numbers e.g. 5.5.)
Major WordPress core updates, like the recently released WordPress 5.5, should be installed manually.
This is because they usually contain new features and can sometimes break your website.
Wait a week or two to make sure that there are no major reported bugs before installing a major WordPress core update. Once you’re satisfied, you can run the update during your weekly maintenance schedule.
Some hosting providers set all WordPress updates to install automatically.
If you want to change this setting, you’ll need to contact your hosting provider.
If there are theme and plugin updates available, you’ll also see them on the WordPress Updates page. All out-of-date themes and plugins should be updated on a weekly basis or sooner.
You can update them one by one, or all at the same time by choosing “Select All,” then “Update Plugins” or “Update Themes,” as necessary.
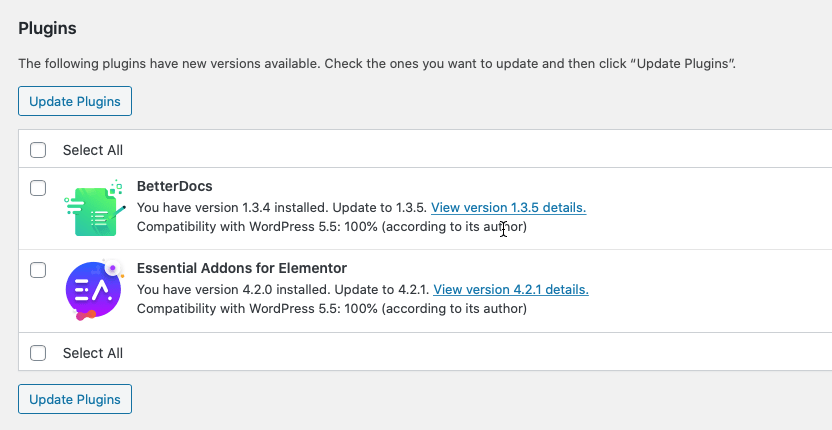
Pay special attention to your security, back up, analytics, and anti-spam plugins. Make sure these are always up to date.
In addition to running updates, make sure to delete any unused themes or plugins (or remove them all together to reduce bloat). This helps to optimize the performance of your website and reduce the size of your backups because you’re not keeping unnecessary files.
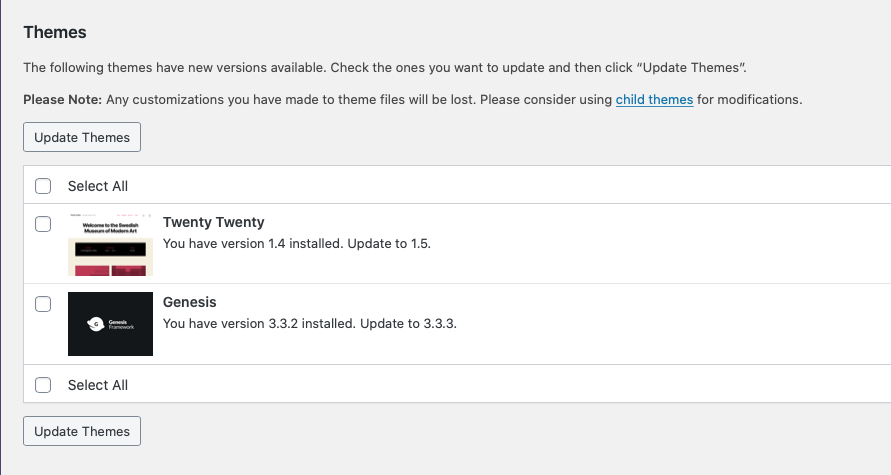
At most, you should only have two themes installed, your active theme and the latest WordPress default theme (e.g. TwentyTwenty) as a backup. If anything goes wrong with your active theme, WordPress will automatically install the default theme. Your site might look weird but at least it won’t go down. Delete any other themes that you’re not using.
4. Check for 404 Errors and Broken Links
 A broken link is a link to a page on your website that does not exist.
This can occur because of a mistyped URL, or when a page is renamed or deleted but the previous URL is still being referenced.
When a user tries to go to a page with a broken link, it will create a 404 error, which indicates that the page could not be found.
404 Errors and broken links can affect your website user’s experience which can in turn cause search engines to get a negative impression of your website.
During your weekly website maintenance, you should also check any broken internal or external links (including affiliate links) you may have referenced in your blog posts as well as inbound links (links pointing to your website).
Tools like the free Screaming Frog’s SEO Spider desktop app and the Siteliner browser app can help you find and fix broken links, errors, and duplicate content.
I prefer to use Siteliner since I can easily use it from my browser to quickly find any issue that needs immediate attention.
All you need to do is plug in your URL (don’t forget to change HTTP to HTTPS if necessary) and click go.
Siteliner will generate a summary of the issues that need attention on your website.
Click on the “Broken Links” option on the left to review any broken links on your site. There are a few options for fixing your broken links.
If the error was caused by an incorrect URL, all you need to do is find the page and make the correction.
Errors caused by delete pages can be fixed by restoring the deleted page or by using a plugin like the Redirection plugin to redirect to another page. Errors caused by changed URLs can also be fixed by redirecting the old URL to the new URL using a plugin.
5. Remove Spam and Test Contact Forms
The final step in your weekly website maintenance is to remove spam comments and form submissions and test your contact forms. Akismet is the best plugin for preventing comments and contact form spam. However, it is only available for free for personal blogs. Subscriptions for business and commercial websites start at $5 USD.
The best free alternative to Akismet is AntiSpam Bee. It’s 100% free, however, AntiSpam Bee only blocks comment spam, not contact form spam. To fix this, I recommend adding Google Recaptcha to your contact forms. It’s easy to set up and most of the free contact form plugins have the option to add it. You can also use the reCaptcha plugin by BestWebSoft to set this up.
As a freelance writer, it’s important for your clients to be able to reach you. You don’t want to miss out on a good lead.
After removing spam comments and form submissions, you should give your contact and subscription forms a quick test. Sometimes a plugin conflict can cause them to stop working.
Make sure that you are still receiving messages through the contact forms as expected and that your subscription automation is still working.
While completing your website maintenance, make sure to document any changes you make. If an issue arises, you or someone else might need to refer to them.
Keeping your freelance writer website safe doesn’t have to be scary or intimidating. With this simple maintenance plan, all you need is one hour a week. Go ahead and add it to your schedule right now, so you don’t forget.


1 Comments