After working hard to create content for your freelancing business and build your personal brand, it is time to look for ways to create additional sources of income as well as alternative lead generation sources.
Re-packaging your content can be an excellent way to reach a wider audience and increase visibility, breathing new life into the content that you’ve already produced.

Specifically, creating a video course can further promote your personal brand (allowing you to start charging more), as well as create a passive income for your business.
If you’d like to get started transforming some of your content into a full video course, I’ve created a step-by-step guide to get you going.
Step 1: Make a Plan
A successful video course can be a little tricky to do correctly but it is till doable.
First things first: decide on a topic for your video series. I would suggest looking over the content that you’ve already created and see where the common thread for your work. This should be your course topic.
From here, outlining subcategories relevant to your decided topic is the next step moving forward.
You can use bullet points or a standard outline to jot down your ideas.
Arranging each of those main points will create a natural flow for your course over time.
Using your outline, you can then identify the holes in what you already have. This is content you need to create from fresh.
Basically, you need put together a spreadsheet with your future course chapters, labeled based on further action to be taken and ideas to implement, for example:
- Chapter 1: Why you should create a video course [WRITTEN, NEEDS A SCRIPT]
- Chapter 2: How to come up with a video course idea that sells [TO WRITE]
- Chapter 3: Examples of video courses that are well set-up [TO WRITE, INTERVIEWS?]
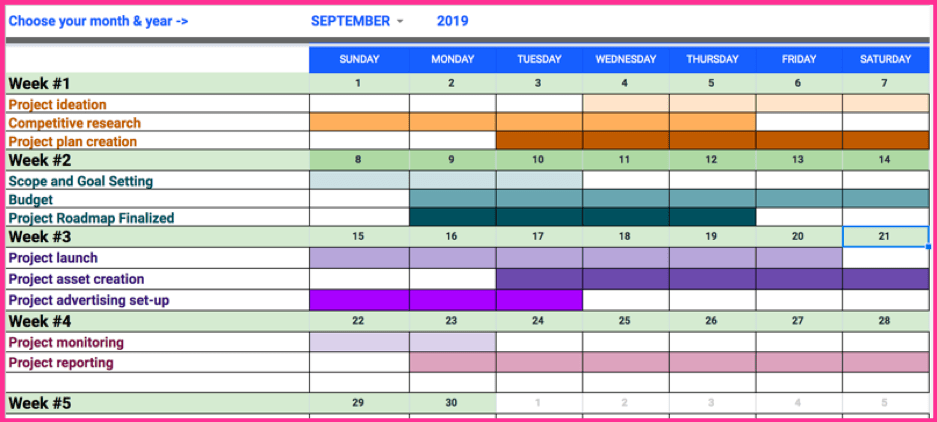
By the end of this process, you should have a clear structure of the final product, logically structured. To get better organized and motivated, use Google Docs project timeline template to plan out how much time you need for each chapter.
Now that you have a plan, it’s time to get to work.
Step 2: Get to Writing
Once you know where the gaps in your outline are, you can focus more of your time on those places.
Go ahead and write new content to cover those gaps and publish them on your blog. You will be able to turn them into video scripts later on.
The next step would be writing video transcripts for future videos using your existing content.
Keep your transcript style consistent to make the course feel seamless and elegant.
Each video should have a script, as well as additional downloadable content asset, for your students. This will add value to your course.
This is a good time you start thinking of ideas to engage your future students. Most video courses have a few exercises for the participants to complete. The more interactive content you have for your students, the more likely they are to retain the information from your course and keep coming back for more.

Step 3: Create Your Videos
It’s time to create your videos.
This can be daunting, but with an extensive amount of formats and tools at your disposal, there is something out there for you to try. Feel free to mix various possible formats for your audience to never get bored:
- Vlogs can create a more relaxed and friendly atmosphere for your participants and have the added benefit of being cheap on resources and time because of its simplicity. The nice thing about Vlogs is that you don’t have to use any expensive software to do those. Your smartphone camera may do the job well. For editing, you can use iMovie (which is free for any Mac users) or Openshot (which runs on macOS, Windows or Linux)
- Interviews: If you have connections in the industry or within your niche (or looking to build some), having interviews can add some authority to your course and pull in a new audience. Using free live streaming platforms (like Facebook or Youtube) is an easy way to host some interviews. My friend Alex at Digital Olympus is doing a good job making those video interviews with niche experts. Use her format for inspiration.
- Tutorials allow for a hands-on demonstration of the topic you’re teaching in your course and help those who learn by doing, not by watching. You can easily put together screencasts using Screencast-O-Matic.com which is free.
- Animations: Using animations does take either time or resources upfront, but it’s worth the effort by creating dynamic content for your participants. Tools like Animatron.com allow you to created whiteboard-style and animated explainer videos without the need for special training.
- Product Reviews and Demonstrations are a great way to introduce your products to your participants and teach them to use the product to their full potential. Again, you can use Youtube Live to stream and record your product demonstrations.
Again, combine a lot of these formats to create a more dynamic course.
The options for content style and format are endless. As long as you can uniquely and eloquently portray the information, there will be no shortage of interest in your course.
Step 4: Put it All Together
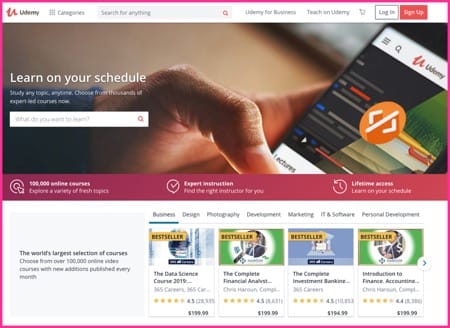
This is the final step of creating your course. With dozens of free online education websites where you can launch your course, it can be easy to get your course out there. Udemy.com is probably the easiest one but it does limit course creators in many ways including enforcing their own pricing models and offering awkward audience engagement options.
That being said, there’s nothing preventing you from giving it a try.
You will at least gain some experience and confidence in building your course up. You can also use Udemy to publish a light version of your course to use it for lead generation rather than income builder.
The next logical step is releasing your course on your own website, to help create a passive income that you have full control over.
Kajabi.com is a platform allowing you to build, host and sell video courses on your own custom website.
It gives you full flexibility as to how you can structure and price your course, and it offers solid tools for you to engage your audience with in-course surveys, interactive quizzes, community forums and personalized emails.
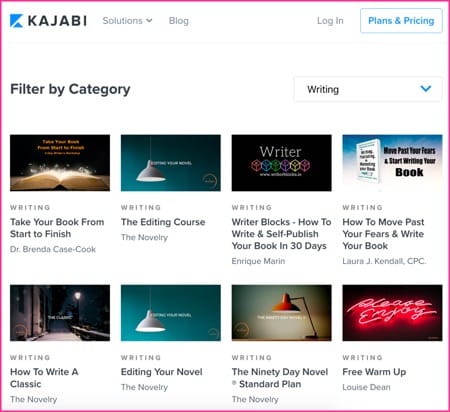
To get a sense of what kinds of courses are most successful for Kajabi’s community of knowledge merchants, you can browse their highly curated marketplace for inspiration:
You can also set up effective landing pages to promote your course and use built-in email marketing automation tools to drive your students back to your site.
You can also try to turn your WordPress site into a course but it will need some development work, so it is likely to require some investment.
Creating an online video course can become an asset to your freelancing business and your brand in the long run.
Start by brainstorming an idea that sparks interest within your niche and creating a detailed plan. From here, create diverse educational videos and come up with various audience building and engagement ideas.
A video course can help you generate more leads and hopefully create a new source of income. And with tools we have these days, you don’t need any investment or training to set up a long-term asset to boost your freelancing brand.
Good luck!


Leave a Reply